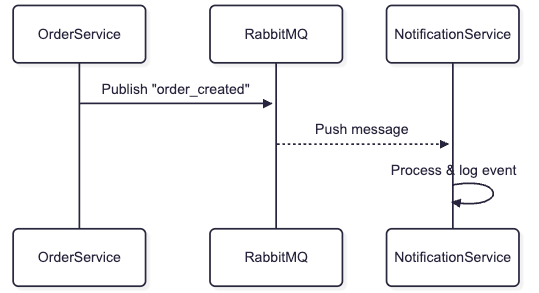
Epoch 6: Event-Driven Architecture with RabbitMQ
In this epoch, students will introduce asynchronous communication into the system using RabbitMQ. Instead of making direct HTTP requests to the Notification Service, the Order Service will publish events (e.g., "order_created") to a message queue, which the Notification Service will then consume and log. This architecture helps decouple services, improve scalability, and ensures fault tolerance between microservices.
Objectives
- Understand the Pub/Sub (Publish–Subscribe) model.
- Install and run RabbitMQ using Docker.
- Use amqplib to connect to RabbitMQ in Node.js.
- Publish messages from order-service.
- Consume messages in notification-service.
1. What is RabbitMQ?
RabbitMQ is a message broker that enables services to send messages to each other via queues, allowing asynchronous, decoupled communication.
Instead of one service calling another directly, it publishes a message to a queue — and other services subscribe to that queue and act upon it.
2. Set Up RabbitMQ with Docker
Add this service to your main docker-compose.yml (you’ll complete this in Epoch 9 — for now, run it separately):
- rabbitmq-docker.yml
1
2
3
4
5
6
7
version: '3'
services:
rabbitmq:
  image: rabbitmq:3-management
  ports:
    - "5672:5672"       # AMQP protocol
    - "15672:15672"     # Management UI
Start RabbitMQ:
1
docker compose -f rabbitmq-docker.yml up -d
Step 1: Install amqplib
In the order-service:
1
npm install amqplib
Step 2: Create rabbitmq.js utility
In utils/rabbitmq.js:
1
2
3
4
5
6
7
8
9
10
11
12
13
import amqplib from 'amqplib';

let channel;

export async function connectRabbitMQ() {
  const connection = await amqplib.connect('amqp://localhost');
  channel = await connection.createChannel();
  await channel.assertQueue('order_created');
}

export function publishOrderCreated(order) {
  channel.sendToQueue('order_created', Buffer.from(JSON.stringify(order)));
}
Step 3: Modify order creation to publish event
In controller after order.save()
1
2
3
4
5
6
7
8
import { publishOrderCreated } from '../utils/rabbitmq.js';

await publishOrderCreated({
  orderId: order._id,
  userId: order.userId,
  totalItems: order.items.length,
  createdAt: order.createdAt,
});
Call connectRabbitMQ() when server starts.
4. Consume Events in Notification Service
Step 1: Install amqplib
1
npm install amqplib
Step 2: Create consumer logic
In src/consumer.js
1
2
3
4
5
6
7
8
9
10
11
12
13
14
15
import amqplib from 'amqplib';

async function consumeNotifications() {
  const conn = await amqplib.connect('amqp://localhost');
  const channel = await conn.createChannel();
  await channel.assertQueue('order_created');

  channel.consume('order_created', (msg) => {
    const content = JSON.parse(msg.content.toString());
    console.log('🔔 Received Order Event:', content);
    channel.ack(msg);
  });
}

consumeNotifications();
Run this file along with the notification server:
1
node src/consumer.js
5. Diagram – Event Flow