Mongoose and query
Setting Up the Project Structure
Create a new folder for your project, e.g., user-registration-api.
Architecture:
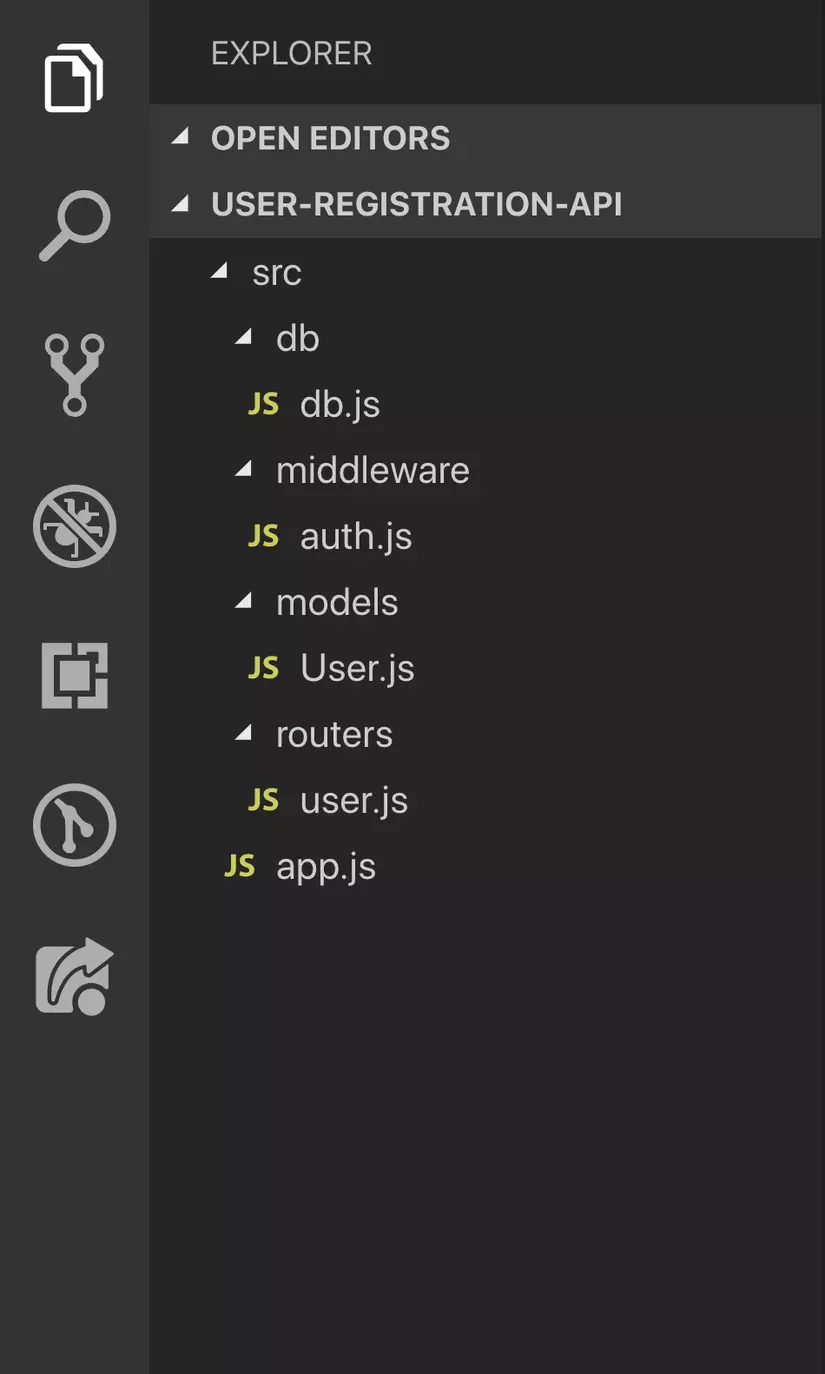
Inside the root directory, we’ll have a main folder named src that contains:
- app.js — The main entry point where the Express server is configured.
- models/ — Contains all the Mongoose models. In this project, we’ll define a single User model.
- db/ — Contains database connection setup files.
- middleware/ — Contains middleware logic. We’ll create an authentication middleware here to protect certain routes.
Step 1: Install Node.js and Create the App
Make sure you have the latest Node.js version installed.
Initialize a new Express app using Express Generator:
1
npx express-generator user-registration-api
Then navigate into the project folder:
1
cd user-registration-api
Install all default dependencies:
1
npm install
Now, add the src/ folder for organizing your code structure:
1
mkdir src src/models src/db src/middleware src/routers
Step 2: Install Required Packages
For this project, you’ll need the following packages:
| Package | Description |
|---|---|
| express | Node.js framework for building web applications |
| mongodb | MongoDB driver for Node.js |
| mongoose | ODM (Object Data Modeling) library for MongoDB |
| bcryptjs | Library for hashing user passwords |
| validator | Used for input validation (e.g., checking valid email format) |
| jsonwebtoken | Implements JWT authentication |
| env-cmd | Allows using environment variables from a .env file |
| nodemon | Automatically restarts the server when code changes |
Install them all using npm:
1
npm install express mongodb mongoose bcryptjs validator jsonwebtoken
For development dependencies (only needed in development):
1
npm install --save-dev env-cmd nodemon
Tạo file .env ở trong thư mục gốc cùng bậc với thư mục src, để đinh nghĩa tất cả các biến môi trường. Mở file package.json và thêm vào đoạn script sau ngay sau dòng main:index.js.
1
"scripts":{"start" : "env-cmd -f ./.env nodemon src/app.js"}
Như vậy mỗi khi ta chạy câu lệnh yarn start, chúng ta sẽ sử dụng nodemon để chạy lại server mỗi khi có thay đổi trong file src\app.js Và chúng ta sẽ sử dụng được các biến môi trường định nghĩa trong file .env
Step 3: Configure Environment Variables
Create a .env file in the root directory and define these environment variables:
MONGODB_URL=mongodb+srv://<username>:<password>@cluster0.mongodb.net/jwt-nodejs?retryWrites=true&w=majority
JWT_KEY=YourSecretKey
PORT=3000
Step 4: Set Up the Server
Create a file named src/app.js with the following content:
1
2
3
4
5
6
7
8
9
10
11
12
13
const express = require('express')
const userRouter = require('./routers/user')
require('./db/db')

const app = express()
const port = process.env.PORT || 3000

app.use(express.json())
app.use(userRouter)

app.listen(port, () => {
  console.log(`Server running on port ${port}`)
})
Update your package.json scripts section to include:
1
2
3
"scripts": {
  "start": "env-cmd -f ./.env nodemon src/app.js"
}
Now run the server:
1
npm start
If you see:
1
Server running on port 3000
Step 5: Connect to MongoDB
Create a file src/db/db.js:
1
2
3
4
5
6
const mongoose = require('mongoose')

mongoose.connect(process.env.MONGODB_URL, {
  useNewUrlParser: true,
  useUnifiedTopology: true,
})
Step 6: Create the User Model
File: src/models/User.js
1
2
3
4
5
6
7
8
9
10
11
12
13
14
15
16
17
18
19
20
21
22
23
24
25
26
27
28
29
30
31
32
33
34
35
36
37
38
39
40
41
42
43
44
45
46
47
48
49
50
51
52
53
54
55
56
57
58
59
60
61
62
63
64
65
66
const mongoose = require('mongoose')
const validator = require('validator')
const bcrypt = require('bcryptjs')
const jwt = require('jsonwebtoken')

const userSchema = new mongoose.Schema({
  name: {
    type: String,
    required: true,
    trim: true
  },
  email: {
    type: String,
    required: true,
    unique: true,
    lowercase: true,
    validate(value) {
      if (!validator.isEmail(value)) {
        throw new Error('Invalid email address')
      }
    }
  },
  password: {
    type: String,
    required: true,
    minlength: 7
  },
  tokens: [{
    token: {
      type: String,
      required: true
    }
  }]
})

// Hash password before saving
userSchema.pre('save', async function (next) {
  const user = this
  if (user.isModified('password')) {
    user.password = await bcrypt.hash(user.password, 8)
  }
  next()
})

// Generate JWT token
userSchema.methods.generateAuthToken = async function () {
  const user = this
  const token = jwt.sign({ _id: user._id.toString() }, process.env.JWT_KEY)
  user.tokens = user.tokens.concat({ token })
  await user.save()
  return token
}

// Find user by credentials
userSchema.statics.findByCredentials = async (email, password) => {
  const user = await User.findOne({ email })
  if (!user) throw new Error('Invalid login credentials')

  const isMatch = await bcrypt.compare(password, user.password)
  if (!isMatch) throw new Error('Invalid login credentials')

  return user
}

const User = mongoose.model('User', userSchema)
module.exports = User
In line 6, we create a userSchema using mongoose.Schema(). This is an object that defines the different properties of the User schema. Mongoose will convert this schema into a MongoDB document, and each property will become a field in that document.
When defining these properties, we specify their characteristics — such as data type, whether they are required, unique, or automatically converted to lowercase, etc. Mongoose provides built-in support for these validations. Additionally, we use the validator package, which offers convenient functions for validating user input — for example, ensuring that a string is a properly formatted email address using isEmail().
We also store an array of authentication tokens in the database. Each time a user registers or logs in, a new token is generated and appended to this list. Storing multiple tokens allows users to stay logged in on multiple devices at the same time. When a user logs out from one device, their sessions on other devices remain active.
From lines 36 to 43, we use a pre-save hook provided by Mongoose. This hook allows us to perform operations before saving a document to the database. In this case, we hash the user’s password before saving the user object. As you know, storing plain-text passwords is a major security risk — so we always encrypt them using bcrypt. The hook also checks whether the password field has been modified before hashing, ensuring we don’t re-hash it unnecessarily.
Another important concept is that Mongoose allows us to define both instance methods and model methods:
- Model methods are defined directly on the model using schema.statics.
- Instance methods are defined on individual documents using schema.methods.
Here, we define an instance method called generateAuthToken, which uses JWT’s sign function to create an authentication token using the JWT_KEY stored in the .env file. Once the token is generated, it is appended to the user’s token list, saved to the database, and then returned.
We also define a model method called findByCredentials, which takes two parameters: user email and password. This function searches for a user with the provided email using Mongoose’s findOne() method.
- If no user is found, an error is thrown to indicate invalid login credentials.
- If a user exists, we compare the provided password with the hashed password stored in the database using bcrypt’s compare method. If the passwords match, the user object is returned.
This method will later be used to authenticate users when they log in to the application.
Finally, we create a User model using mongoose.model('User', userSchema) and export it so it can be reused across different files in the project.
Step 7: Create Authentication Middleware
File: src/middleware/auth.js
1
2
3
4
5
6
7
8
9
10
11
12
13
14
15
16
17
18
19
20
21
22
const jwt = require('jsonwebtoken')
const User = require('../models/User')

const auth = async (req, res, next) => {
  try {
    const token = req.header('Authorization').replace('Bearer ', '')
    const data = jwt.verify(token, process.env.JWT_KEY)
    const user = await User.findOne({ _id: data._id, 'tokens.token': token })

    if (!user) {
      throw new Error()
    }

    req.user = user
    req.token = token
    next()
  } catch (error) {
    res.status(401).send({ error: 'Not authorized to access this resource' })
  }
}

module.exports = auth
An Express middleware is a function that takes three parameters: request, response, and next. In line 5, we extract the token from the request header. Since the token has the format “Bearer [space] token”, we need to replace “Bearer “ with an empty string (‘’).
Once we have the token, we use the JWT verify method to check whether the received token is valid and was created using the JWT_KEY. The verify method returns a payload, which contains the data used to generate the token (in this case, the token was created with the user’s ID).
Now that we have the payload from the token, we search for a user whose ID matches the one from the payload. If a user is found, we attach the user to the request object (req.user = user) and also attach the token to the request.
Finally, we call the next() method to move on to the next middleware. If next() is not called, the application will freeze at that point and will not continue executing the remaining code.
Now it’s time to use the auth middleware.
Open the file /routers/user.js, and import the middleware by requiring it after importing the User model.
Step 8: Define Routes
| Endpoint | Method | Description | Requires Token? |
|---|---|---|---|
/users | POST | Register a new user | - |
/users/login | POST | Log in a user | - |
/users/me | GET | Retrieve the authenticated user’s profile | Yes |
/users/logout | POST | Log out from the current device | Yes |
/users/logoutall | POST | Log out from all devices | Yes |
Create a new file src/routers/user.js:
1
2
3
4
5
6
7
8
9
10
11
12
13
14
15
16
17
18
19
20
21
22
23
24
25
26
27
28
29
30
31
32
33
34
35
36
37
38
39
40
41
42
43
44
45
46
47
48
49
50
51
52
53
54
55
56
57
58
const express = require('express')
const User = require('../models/User')
const auth = require('../middleware/auth')

const router = new express.Router()

// Register a new user
router.post('/users', async (req, res) => {
  try {
    const user = new User(req.body)
    await user.save()
    const token = await user.generateAuthToken()
    res.status(201).send({ user, token })
  } catch (error) {
    res.status(400).send(error)
  }
})

// Login existing user
router.post('/users/login', async (req, res) => {
  try {
    const { email, password } = req.body
    const user = await User.findByCredentials(email, password)
    const token = await user.generateAuthToken()
    res.send({ user, token })
  } catch (error) {
    res.status(400).send(error)
  }
})

// View logged-in user profile
router.get('/users/me', auth, async (req, res) => {
  res.send(req.user)
})

// Logout from current session
router.post('/users/me/logout', auth, async (req, res) => {
  try {
    req.user.tokens = req.user.tokens.filter(t => t.token !== req.token)
    await req.user.save()
    res.send()
  } catch (error) {
    res.status(500).send(error)
  }
})

// Logout from all sessions
router.post('/users/me/logoutall', auth, async (req, res) => {
  try {
    req.user.tokens = []
    await req.user.save()
    res.send()
  } catch (error) {
    res.status(500).send(error)
  }
})

module.exports = router
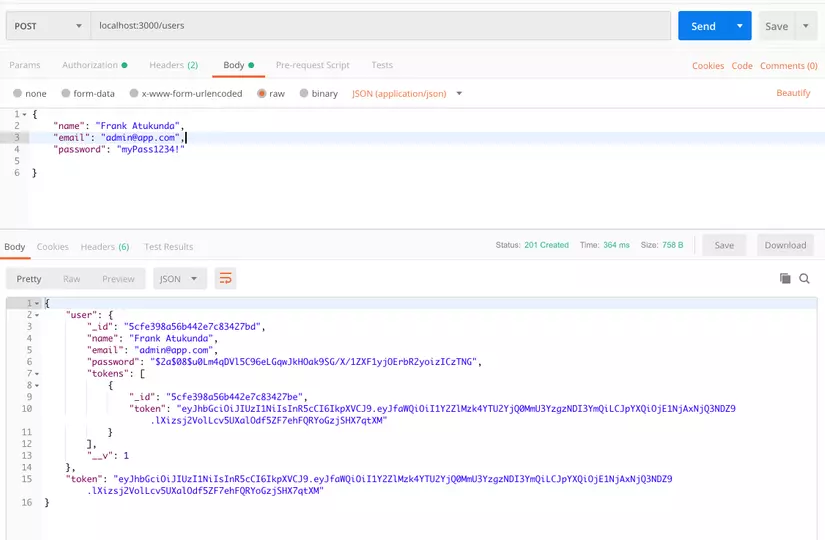
Register a new user
The user registration route creates a new user using the information provided in req.body. After saving the user, the system generates an authentication token and returns it in the response along with the user data.
To test using Postman: select the data type JSON (application/json), click on the Raw option, and enter the following sample data:
1
2
3
4
5
{
  "name": "Frank Atukunda",
  "email": "admin@app.com",
  "password": "myPass1234"
}
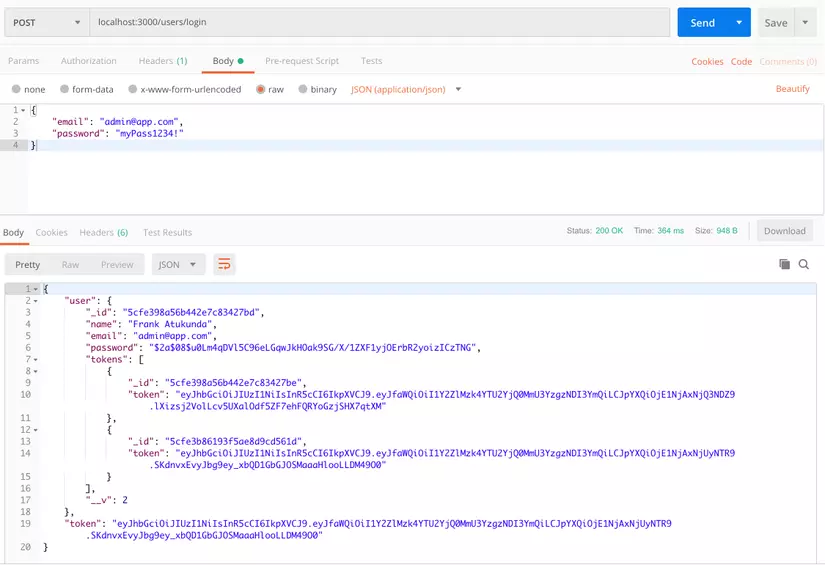
Login a registered user
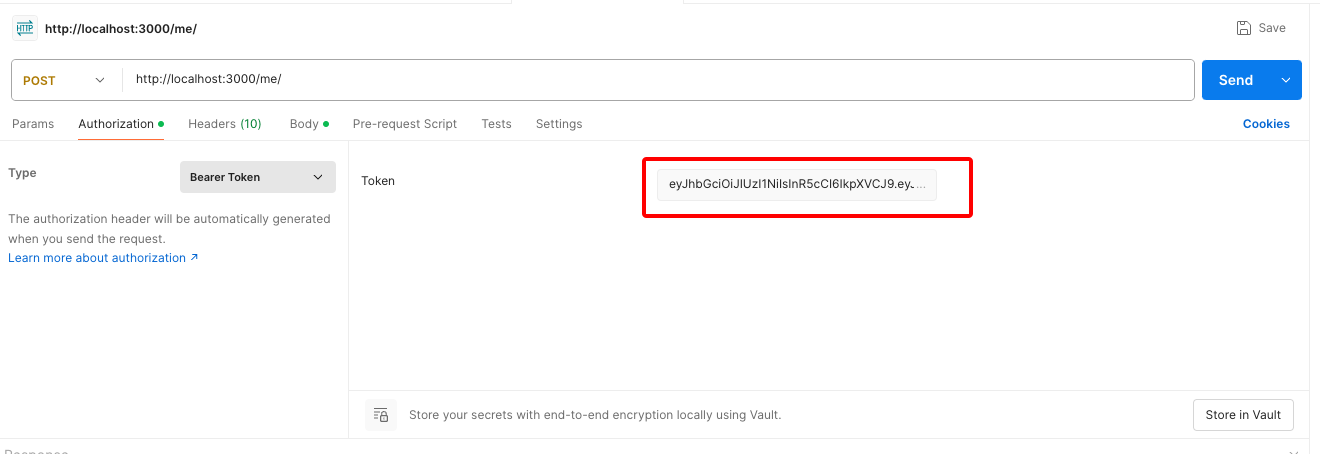
Test using Postman: enter the correct URL, go to the Authorization tab, select Bearer Token from the dropdown menu, and provide the authentication token on the right — this is the token you received after logging in.
1
2
3
4
{
  "email": "admin@app.com",
  "password": "myPass1234"
}
Set authentication
Step 9: Test the Endpoints (Postman)
- Register a user
- POST → /users
- Body → JSON: { “name”: “John”, “email”: “john@example.com”, “password”: “mypassword” }
- Login
- POST → /users/login
- Get profile
- GET → /users/me
- Auth → Bearer Token (use the token from login)
- Logout current session
- POST → /users/me/logout
- Logout from all sessions
- POST → /users/me/logoutall